The short version: A non-electric bidet attachment needs a screwdriver, a towel, and, at most, an adjustable wrench. Shut off the water, take the seat off, set the plate on the bowl with the nozzle just in front of the back rim, put the seat back on top, and tee into the tank’s 7/8 inch fill valve shank. Luxe puts a cold-water install at about 15 minutes. Water joints go hand tight plus a quarter turn.
Bidet attachments are the thin plates with a control knob that sit between the bowl and your existing seat. They need no outlet and no new plumbing, which is why most people install them themselves.
The job is mostly a matter of order and gentle hands: the parts are plastic, the seals are rubber washers, and nearly every problem afterwards traces back to a washer, a bolt, or the plate’s position.
This guide follows the installation manuals from Tushy, Luxe Bidet, Brondell (SimpleSpa and Omigo), and Bio Bidet, and notes where they differ. If you are installing a full electric seat instead, our bidet seat installation guide covers that job.
On this page
Tools, Parts and Time
The manuals agree on a short tool list. You need a flathead or Phillips screwdriver for the seat bolts, and an adjustable wrench for metal-to-metal fittings. Tushy also suggests pliers for holding a seat nut that spins.
Keep a towel or a small bucket under the tank, since some water stays in the supply line even after the tank is drained. Thread tape is optional, and more on where it belongs below.
In the box you will usually find the attachment itself, a T-adapter (also called a T-valve), a braided bidet hose, rubber washers, and sometimes round or slotted mounting brackets. Warm-water models add a second, smaller T-adapter for the sink and a length of plastic tubing; Tushy’s Spa 3.0 includes 6 feet of it.
Lay everything out and find each washer before you start, because a missing washer is a common cause of leaks.
Luxe’s guide puts a cold-water installation at about 15 minutes. Budget extra time for a warm-water model, for a seat with stubborn or corroded bolts, and for the hour of leak checking Tushy recommends afterwards. If kneeling is hard, Tushy suggests kneeling on a folded towel or the product box.
Check the Fit Before You Start
Most attachments fit most two-piece toilets, but a few minutes with a tape measure can save a return. Our toilet compatibility guide walks through every measurement in detail. For an attachment, these are the checks that matter most.
Seat Bolt Spacing and Tank Clearance
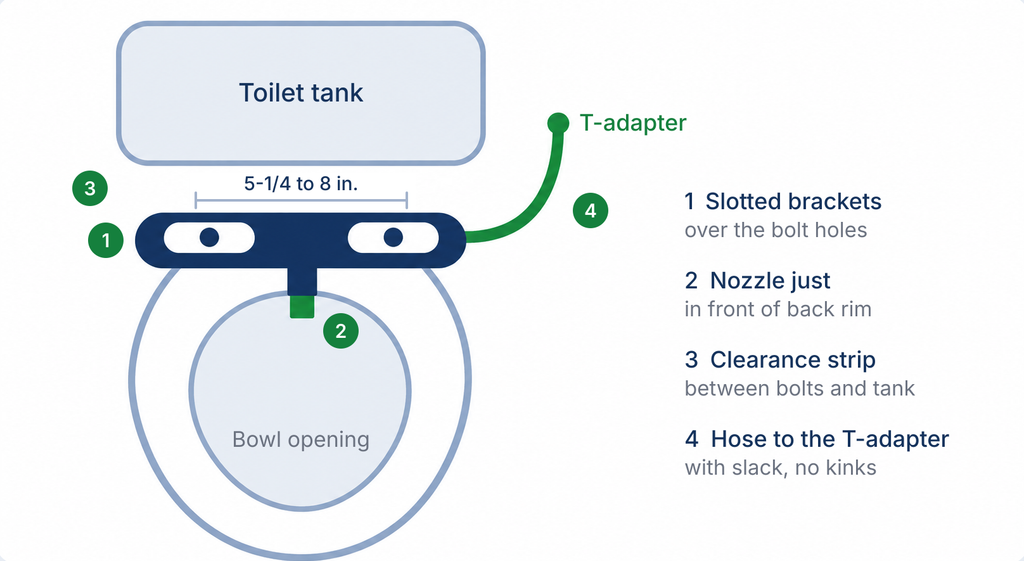
Measure center to center between the two seat bolt holes. Brondell’s attachments accept 5-1/4 to 8 inches, while Bio Bidet’s compatibility page says spacing under 5.5 or over 7.5 inches will likely be a problem.
Then check the space behind the bolts. Brondell asks for at least 3/4 inch between the bolt hole center and the tank; Bio Bidet’s general guide asks for 1.5 inches. The plate has to fit in that strip.
The Plate Lifts Your Seat
Because the plate sits under the seat’s hinge, the back of the seat rises. Tushy says its attachment adds about 1/2 inch, and that you may need longer seat bolts to cover it. Some kits ship with tall hinge covers for this reason. The seat bumpers at the front may no longer rest firmly on the rim, which is why some seats feel a little loose afterwards.
Check the underside of your seat too. Brondell says a seat with a concave or recessed bottom leaves a gap over the plate and should be replaced with a flat-bottomed seat.
One-Piece, Skirted and Curved Toilets
One-piece toilets usually work, but two details can get in the way.
The first is a curved tank joint (a French curve), where the tank sweeps into the bowl right behind the bolts. Luxe says that if the plate will not sit flat or line up with the bolt holes, a curved tank-to-bowl connection is the likely cause. Brondell gives a separate measurement for these toilets, and Bio Bidet says deep French curves do not fit its products well.
The second is a skirted toilet, where smooth side panels hide the fill valve. The T-adapter has to reach that valve, so check that you can get to it.
Tushy sells a skirted toilet kit, and Brondell lists an alternative T-valve for some skirted models. Also look at the line from the wall to the tank: Brondell, Bio Bidet, and Tushy all say a rigid pipe must be swapped for a flexible supply hose first.
Installation Steps
The manuals we reviewed cover the same steps, but the order varies. Luxe seats the plate first, as we do below. Tushy connects the water before seating the plate, while Brondell and Bio Bidet fit the T first and connect the hose to the plate last. Any of these orders works as long as the hose has slack.
Keep the control knob at off throughout, as Brondell advises, so the first rush of water does not spray across the bathroom.
1. Shut Off the Water and Drain the Tank
Turn the shut-off valve behind the toilet clockwise until it stops. Some valves are push-pull instead, and Luxe notes that you pull those outward to close them. Flush and hold the handle until the tank is nearly empty; Tushy says an inch of water left in the bottom is fine. If the valve is stiff, Tushy suggests working it gently back and forth rather than forcing it.
2. Remove the Seat
Flip up the hinge caps and unscrew the bolts counterclockwise, holding the nut underneath so the bolt does not just spin. Luxe notes you do not always have to take the seat fully off; loosening it enough to slide the plate under can be enough. A quick-release seat usually unclips, then its mounts unscrew from the bowl.
3. Position the Plate and Slide It to Align
Set the attachment on the rim with the nozzle toward the back of the bowl. Most models have slotted plates or round brackets that turn or slide so the bolt holes line up; rotate them until you can see the porcelain holes through them.
The nozzle should sit just in front of the back rim, close but not touching. Brondell describes a slight gap that varies by toilet, and Tushy says to leave enough space between rim and nozzle.
4. Reinstall the Seat
Set the seat on top of the plate and pass the bolts through the seat hinge, the plate brackets, and the porcelain. If the kit includes longer bolts, use them; the original bolts may now only catch a thread or two.
Tighten until neither the seat nor the plate moves, which is the standard Brondell and Bio Bidet both use. Bio Bidet’s SlimEdge adds rubber non-slip mats under the plate to help it stay put.
5. Fit the T-Adapter on the Tank Shank
With the towel in place, unscrew the supply line from the threaded stub under the tank (the fill valve shank). Leave the other end on the wall valve.
Check that the rubber washer is inside the top of the T; Bio Bidet and Brondell say the narrow, tapered side faces up. Thread the T onto the 7/8 inch shank by hand, then screw the original supply line onto the bottom of the T.
Watch the threads as you go. Tushy warns that if a nut turns only about once and then stops, it is probably cross-threaded, and you should back it off and start again rather than force it. Make sure the old washer from the supply line is not still stuck on the shank, or you end up with two.
6. Connect the Bidet Hose
Screw one end of the braided hose onto the side port of the T and the other onto the inlet under the attachment. Luxe’s hose has a mesh filter at the T end, so check which end is which.
Route the hose so it has a little slack and no tight bends, which can restrict flow. If water feels weak later, our low pressure guide starts with the hose and filter.
7. Warm-Water Models: Tap the Sink Hot Line
Warm-water attachments do not heat anything. They mix in water from your sink’s hot supply, so the sink must be close enough for the tubing to reach.
Close the hot valve under the sink; Luxe suggests running the hot tap and closing one valve to find out which is hot. Disconnect the faucet’s hot line, fit the small T-adapter onto the 3/8 inch valve outlet, and reconnect the faucet line to the top of the T.
Then connect the plastic tubing. Luxe uses a hex nut over the tube, and Brondell a pressure cap; Tushy’s current Spa 3.0 manual has the tube’s free end screw onto the warm water inlet, and Tushy says finger tight is just right, though its support page describes a push-to-connect adapter, so check which you have.
Tushy notes that sink valves in California can be 1/2 inch, and Brondell lists a 1/2 inch to 3/8 inch reducing adapter for those. Brondell also advises keeping the water heater at 120°F or lower.
If you are not connecting warm water on a dual-inlet model, cap the unused hot inlet with the cap supplied. Omigo’s manual says the unit will leak without it. Our water temperature explainer covers why sink-fed warm water takes a few seconds to arrive.
8. Turn the Water On Slowly and Test
Open the toilet valve slowly and watch each joint as pressure builds. Dry every fitting, then run a dry tissue around each one.
Brondell says to wait 5 to 10 minutes and check again; Tushy suggests leaving a towel underneath and checking after an hour. Only then try the spray, at the lowest pressure setting, and turn the knob up gradually. With warm water, test the temperature on your hand first.
How Tight Each Joint Should Be
Unless your manual says otherwise, our rule for water joints is hand tight plus a quarter turn. Spin the nut on by hand until it stops, then give it one more quarter turn.
Use a wrench for that last quarter only where metal meets metal; on a plastic fill valve, tighten even a brass nut by hand. TOTO says a plastic T-connector needs finger tightening only, and Tushy warns that overtightening can cause leaks or damage. The rubber washer does the sealing, not the force.
Thread tape is optional. Luxe suggests it on the supply line threads, and Brondell and Bio Bidet suggest it for a joint that still leaks. If you use it, wrap the threads only, never the washer, and skip compression joints, where Oatey says tape can cause leaks.
Small plastic nuts can be hard to turn with stiff hands; a rubber jar-opener pad helps, and our limited mobility guide covers other grip and reach aids.
| Joint | Connects | How tight | Common mistake |
|---|---|---|---|
| Top of the T | T-adapter to the 7/8 inch fill valve shank | Hand tight plus a quarter turn; by hand if the T or fill valve is plastic | Washer missing, upside down, or doubled with the old one |
| Bottom of the T | Original supply line to the T | Hand tight plus a quarter turn | Cross-threading the nut at an angle |
| Side port of the T | Braided bidet hose to the T | Hand tight, snug | Using a wrench on a plastic port |
| Attachment inlet | Bidet hose to the plate | Hand tight, snug | Kinking the hose when the plate is pushed back |
| Sink hot T (warm models) | Small T to the 3/8 inch sink valve | Hand tight, then light wrench on brass | Valve is 1/2 inch and needs an adapter |
| Hot tubing | Tubing to the sink T and plate | Fully seated; cap or nut snug | Tube not pushed in far enough |
| Seat bolts | Seat and plate to the bowl | Until seat and plate do not move | Original bolts too short after the plate lifts the seat |
Common Problems After Installation
Most first-week complaints fall into a handful of groups, and each has a simple first fix.
The Seat Wobbles or Shifts
Because the plate raises the back of the seat, the seat can rock or slide sideways when someone sits down. Brondell’s manuals call for tightening until the seat and plate do not move, and adding the large washers supplied in the kit if needed.
Longer bolts help if the nuts are barely engaged. Self-adhesive bumper pads on the seat underside can fill the gap at the front, a fix many owners use.
A seat that still moves after that is worth taking seriously, especially for someone who lowers themselves slowly or uses the seat for balance. If a wobble will not go away, check the seat’s underside shape and consider a flat-bottomed replacement seat.
A Drip at the T
Shut the water off, open the wet joint, and look at the washer before tightening anything harder. Our T-valve leak guide walks through finding which joint is wet and fixing each one.
Spray Hits the Seat or Misses
Spray that strikes the seat rim or lands off target is almost always a position problem. Omigo’s manual says to loosen the bolts, shift the attachment slightly forward, and retighten. Luxe says a seat lip touching the nozzle assembly can change the spray angle, and supplies tall hinge covers to raise the seat clear.
The Nozzle Guard
Many attachments have a hinged guard over the nozzle. Luxe’s guard gate stays closed when the nozzle is at rest, shields it from debris and splashback, and opens by hand for cleaning. If the nozzle catches on the guard or will not tuck back, our nozzle retraction guide covers the usual causes.
When to Call a Plumber
Stop and call a plumber if the shut-off valve will not turn, will not fully close, or starts leaking from its own stem when you move it. Old valves can fail when disturbed, and a valve that will not close means water to the toilet cannot be stopped.
A rigid supply pipe that has to be cut, or a fill valve you cannot reach, are also good reasons to hand the job over.
The same goes for a warm-water hookup where the sink valve is corroded or the tubing would have to cross a walkway. If you are still deciding between an attachment and a full seat, our attachment versus seat comparison lays out the trade-offs.
Image credit, cropped: photo by Robert Basic from Germany, Wikimedia Commons, CC BY-SA 2.0.